How to get started
Registration
Create yourself an account to the Test My Code (TMC) server in address https://tmc.mooc.fi/mooc/user/new
If you already have an account in TMC, you do not need a new one. Ensure that you remember your password by logging in to https://tmc.mooc.fi/mooc/.
Installation of the programming environment
In the course we’ll be using version 8.1 of the NetBeans Integrated Development Enviroinment and the TMC plugin to download and submit the programming assignments. NetBeans requires Java development kit (JDK) to be installed.
As an alternative to NetBeans, you may use Jetbrains’s IntelliJ IDEA. Both the commercial Ultimate version and the free Community edition of IntelliJ IDEA will work with our TMC plugin.
NOTE: If you have an old version of NetBeans on your computer, we recommend that you remove it before installing the new version. When the installation procedure asks if the old setting should be imported, answer “no”.
Does the installation of Java to your computer cause a security risk? Not directly. The use of JDK and NetBeans do not cause any risk. The risks involved with Java are related to certain Web-pages that use Java-based components. Nothing we do in this course can cause any security risk to your computer. The installation of JDK also installs a Java plugin to your internet-brower. It might be wise to disable that plugin. For more information, see http://krebsonsecurity.com/how-to-unplug-java-from-the-browser/.
-
Installing JDK (the same whether you’re using Netbeans or IntelliJ)
If you already have JDK 7 or newer installed, go directly to step 2.
Download the most recent version of JDK “Java SE Development Kit 7uxx” from the address http://www.oracle.com/technetwork/java/javase/downloads/jdk7-downloads-1880260.html. If you are a Linux user, see the information below!
Accept the licence, select a suitable version for you computer and do the installation.
-
In Windows the installation proceeds similarly as installations of any Windows program.
-
In OS X (Mac), the installation resembles installation of any dmg-package. NOTE: you need Mac OS X 10.7.3:n (Lion) or a more recent OS X -version. Oracle provides detailed information about the installation http://docs.oracle.com/javase/7/docs/webnotes/install/mac/mac-jdk.html If installation complain about developer id, see http://support.apple.com/kb/ht5290.
-
In most Linux distibutions you get JDK directly from the packet management. In Debian based distributions (eg. in Ubuntu) it is enought to install the package openjdk-7-jdk which can be done in command line with the command
sudo apt-get install openjdk-7-jdk -yor by using the Synaptic Package Manager. In the case that your distribution does not provide a suitable JDK, you can do the installation by extracting the .tar.gz-file found on the Oracle page.
-
Next, choose one of 2a or 2b Depending on which programming environment you’re using
2a. Installing NetBeans
JDK must be installed before installing NetBeans.
Download the NetBeans/TMC-bundle suitable for your computer by right clicking and selecting “save link as”:
- Windows
- The installation is done by opening the downloaded executable file
- OS X (Mac)
- The installation is done by extracting the contents of the downloaded package and then running the Netbeans with TMC Installer.app. The installer installs TMC-NetBeans to your computer. After the installation, the program is found from the Applications-folder.
- Linux
- The installation is done by executing the installation script by giving the command
./tmc-netbeans_mooc_tmcbeans-linux.shin the directory where the file is located - The script can be executed only if it has been given right permissions eg. with command
chmod o+x tmc-netbeans_mooc_tmcbeans-linux.sh. - In Ubuntu, for example, the execution permissions can be given using the File browser by right clicking the script and selecting Properties / Permissions / Allow executing file as program. After doing this, the script can be executed by clicking it.
- The installation is done by executing the installation script by giving the command
2b. Installing IntelliJ IDEA
First, download IntelliJ IDEA Community version. Choose your operating system and in the address linked, press the Download button.
- Windows
- The installation is done by opening the downloaded executable file.
- OS X (Mac)
- The installation is done the same way as any .dmg package. Move the IDEA app inside the downloaded package to your Applications folder.
- Linux
- The installation is done by executing the installation script by giving the command
./bin/idea.shin the directory where the file is located. - The script can be executed only if it has been given right permissions eg. with command
chmod +x bin/idea.sh. - In Ubuntu, for example, the execution permissions can be given using the File browser by right clicking the script and selecting Properties / Permissions / Allow executing file as program. After doing this, the script can be executed by clicking it.
- The installation is done by executing the installation script by giving the command
Then, download the TestMyCode plugin:
When IntelliJ opens for the first time, you get to a welcome screen. At the bottom, choose Configure / Plugins. At the bottom of the window that opens, choose “Browse repositories” and type “TMC” to the search field. Install “TestMyCode plugin for IntelliJ” and restart the program.
Completing and submitting the programming assignments with Netbeans or IntelliJ
If you’re using Netbeans with TMC, the first time you start it, the below window should open. If it does not open, you can find it from the TMC / Settings. If you’re using IntelliJ, you get to a Welcome screen, in which you can press the “Get started with TMC” button.
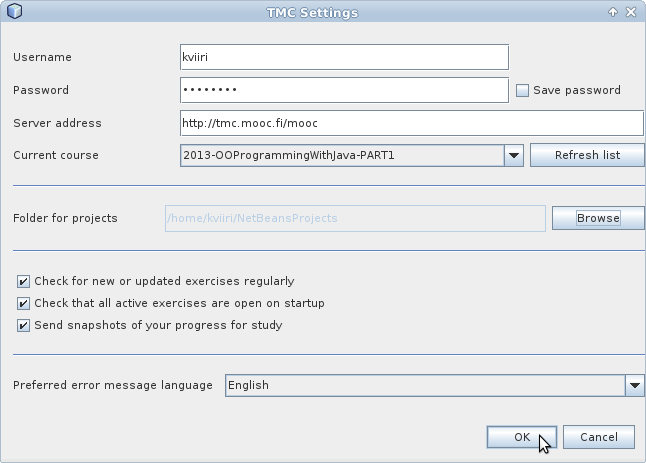
Give the Username and Password that you gave during registration.
Press the button “refresh list” and select course from “Current course”.
By pressing “ok” the assignment “projects” are downloaded to your computer.
The next video shows how to program and submit the assignments using TMC/NetBeans. The process is mostly the same in IntelliJ, but with one important distinction: The first time you open up an exercise, you need to set the JDK that you installed earlier. IntelliJ should ask you to give it, but if not, you can set it from File / Project Structure at “Project SDK” part. This step is not required for those that use NetBeans.
Now you are finally ready to start the course!